Recovering data from falling Windows HDD with Hiren Boot USB
Date: October 19, 2020
Introduction
Computer experience of casual users still mainly relies on Windows systems. These systems have one minus, they don’t alert user if hard disk is failing, and it becomes clear only when system doesn’t want to load. In my case the problem of stuck “Automatic Repair Mode” appeared on Lenovo laptop with motherboard UEFI support.
Preparing tools.
For diagnostics I prepared Hiren’s BootCD USB. Why not Linux? Because Hiren’s BootCD is quite a strong tool for recovering Windows systems. It can easily read Windows product keys.
Or run chkdsk on falling NTFS partition. And all this not not to mention access to Windows registry, MBR fix and file recovery utilities.
I used Debian-based home OS to create bootable UEFI USB. For the start, ISO image and pen drive are required. Unfortunately, software creators offer a tool for Windows systems only, Linux community have to open Terminal.
fdisk /dev/sdbis the first command to run, we need to partition table, in my case it is MBR, or DOS (o), later a new partition (n, p, Enter, Enter, Enter), which should be bootable (a) and have a type W95 FAT32 LBA (t, c), at the end changes should be written to disk (w);
mkfs.vfat -F 32 /dev/sdb1 command formats partition as FAT32.
mount /dev/sdb1 /media/username/pen_drive command mounts (if your OS doesn’t do it automatically) the partition to the necessary folder
mkdir hirenboot command creates folder for mounting ISO image.
mount -o loop HBCD_PE_x64.iso hirenboot/ command mounts ISO image to the folder as read-only.
cp -R hirenboot/* /media/username/pen_drive/ -v command copies all the files from ISO to pen drive.
umount /dev/sdb1 command unmounts pen drive.
Recovery process
Unfortunately, the load from BIOS is disabled in the latest version, as we can see, there is no isolinux.cfg file present as in the older version, only EFI folder (left image - old Hiren’s BootCD 15.2 with BIOS support, right image - new Hiren’s BootCD PE with UEFI loader only).

The best way to recover files is to create full disk image
via dd_rescue, read as many blocks as possible, and only later try to run any filesystem recovery mode. I had an advantage, most of critical files were backed up to the cloud storage, and I only had to get access to the latest creates ones plus start the system at any GUI mode to recover access to some accounts. That’s why I’ll do everything on direct HDD, although it’s often not recommended.
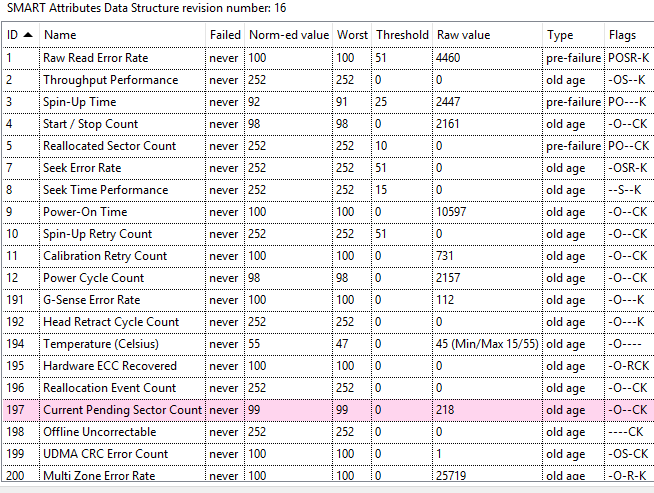
Before the disk repair, I saved the HDD SMART state from GSmartControl utility.
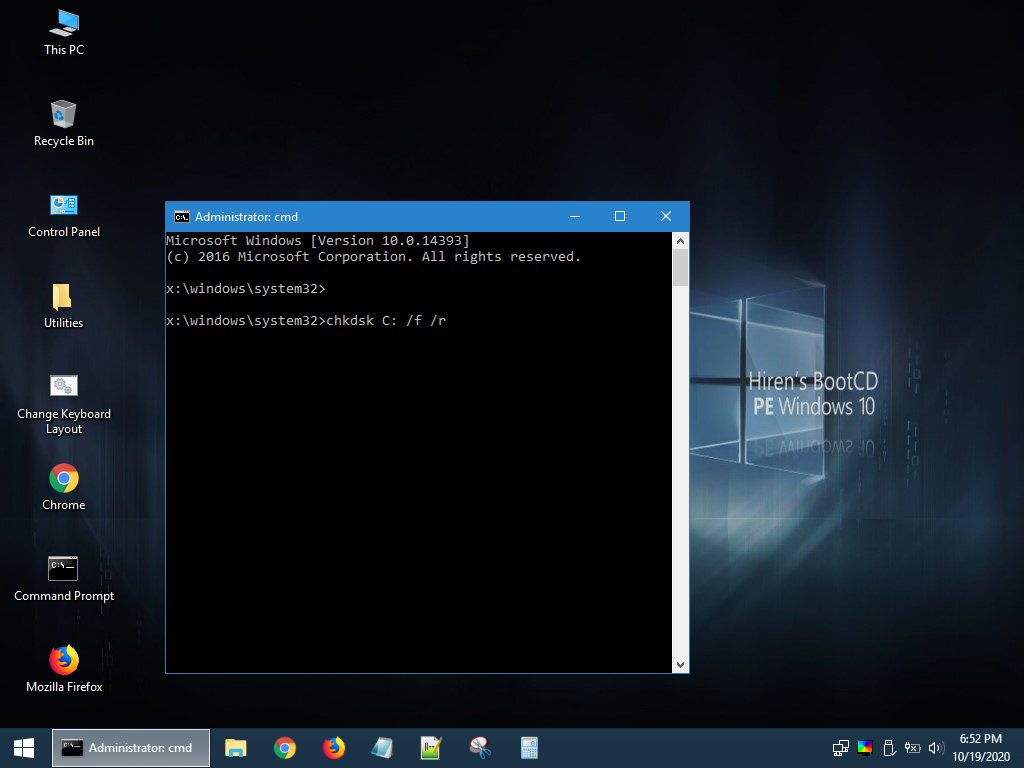
In order to repair filesystem, I’ll use chkdsk C: /f /r command. /f keys means that system will try to fix the errors, /r key will try to recover data from bad sectors. I should notice, that chkdsk command may take a lot of time, depending on size and condition of HDD in the sectors of partition. Recovering some bad section for hours shouldn’t become a big surprise.
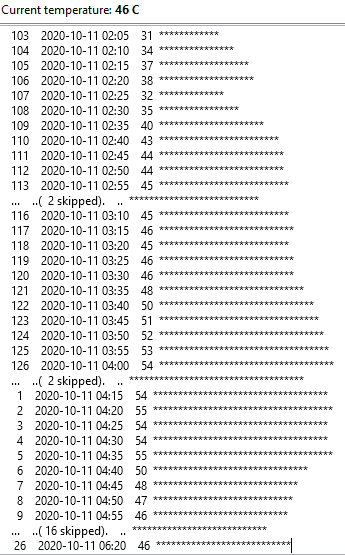
During the recovery process I’ve noticed, that HDD temperature went up really high. Producent shows 55°C as max operating temp for this model, and it’s still 5-10 degrees more than max temp of healthy HDD I’ve seen in the same slot of my PC.
HDD SMART after the recovery after 20-30 min of recovery already looks like this, several hundreds new read error and new pending sectors.

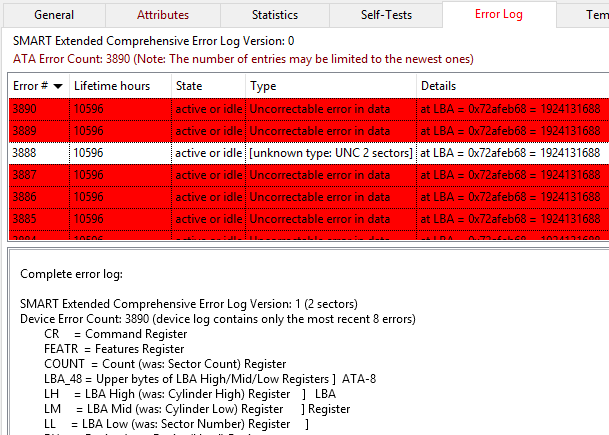
One more scary thing in this HDD is the tab “Error log” in GSmartControl, which showed uncorrectable data errors during the latest hours of HDD usage.
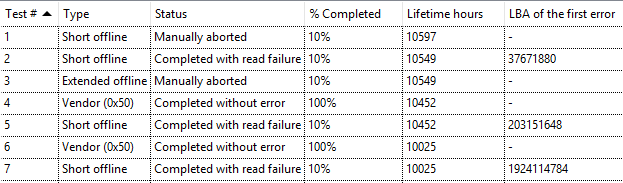
It’s quite interesting to take a look at latest self-test results. As we can see, the HDD during latest hundreds of hours started to show read errors, which sometimes disappeared between self tests, but closer to the failute moment they started to appear at sectors with lower LBA number.
Result
As the result of all efforts, I managed to boot the laptop into Windows system without using the more complicated option (create disk image via dd_rescue and run it via virtual machine). Task is done, now it’s possible to get access to all the necessary accounts and peacefully wait until the broken drive will be replaces by new one.