Creating Proxmox HA cluster in home conditions
Date: November 22, 2020
Introduction
Virtualization is a huge branch of IT and a necessary tool to create any stable service. However, it’s not that easy to get into the topic from zero, and I’ll try to explain all the necessary steps to build simple HA cluster in home condition.
Necessary equipment
Smallest Proxmox cluster which can work as High Awailability, consists of 3 nodes. It means that there must be at least 3 physical machines to create the cluster, and 2 of them must have an option of installing additinal OS on the machine (better even an empty hard drive for this purpose). Why so many? Nodes No. 1 and No. 2 should be the ones, which can take virtual machine on board, if one of them is falling, node No. 3 (don’t have to be run on physical machine, can be run on VM) is required to oberve the condition of cluster, that’s why it doesn’t need to have any strong resources (CPU, momory or disk space). Additionally one more virtual machine (better be launched from physical machine No. 3) is required to work as iSCSI storage.
Let’s imagine an example, that we don’t have enough equipment and decide to create HA cluster with 2 nodes. If one them is falling, Proxmox won’t understand what’s going on, is the connection lost because another node is down, or this exact node is outside the main network. Experiments showed that cluster won’t work as intended.
Installation
As a virtualization platform, I’ll use Proxmox solution. Of course there are other options, but this one is free, open-source and has enough developed community. Usual KVM virtualization, as for this moment, doesn’t have a convenient web interface for cluster machines management, only a GUI (for example virt-manager package for Debian). VMWare solutions have a test period of 60 days, which ends up with disabling some key features of the platform (like vCenter), up till free version.
There are 2 ways to install Proxmox: as a standalone OS, or above existing Debian system. Second option ends up with compiling it’s own Linux pve core. The plus of second solution as for test cluster is an option to leave Debian GUI and use the machine for other purposes.
Before the installation it’s better to think about nodes addresation, I’ll use 192.168.0.150-153/24 (.150-152 for Proxmox nodes and .153 for iSCSI server) and about hosts naming. There are 2 options, to use something like proxmox-01 (enough for test purposes) or proxmox-alice, if you plan to expand the infastructure (numbers can easily make a mess in the future, when it will be hard to understand why there are proxmox-11, proxmox-13, but no proxmox-12 node in the cluster). During the installation I’ll use proxmox-0* machine name on the Debian system, mydomain.local domain name for Debian system and proxmox-0*.mydomain.local as FQDN (full name) of the server.
Installing Proxmox on Debian
During Debian system installation, it’s better to think about disk space usage in advance. Proxmox can easily write VMs virtual disks on the partition mounted as / (named as local in the web interface). However, it can easily accept another partition mounted as a folder. If Proxmox in installed on physical server, it makes sense to think about using
LVM.
During Debian installation, do not disable root user. Otherwise it will cause issues at the step of adding nodes to cluster. Additionally it makes sense to install SSH server in order to have an ability to control the system. Right after install you should check, if the user can login as sudo. In my Debian version sth was wrong with root rights after install, I couldn’t run commands as sudo and couldn’t login into system as sudo. That’s why I rebooted the system, ran it in recovery node from GRUB, and added my user to sudo group using command usermod -aG sudo username and allowed root SSH login by running nano /etc/ssh/sshd_config and setting PermitRootLogin yes.
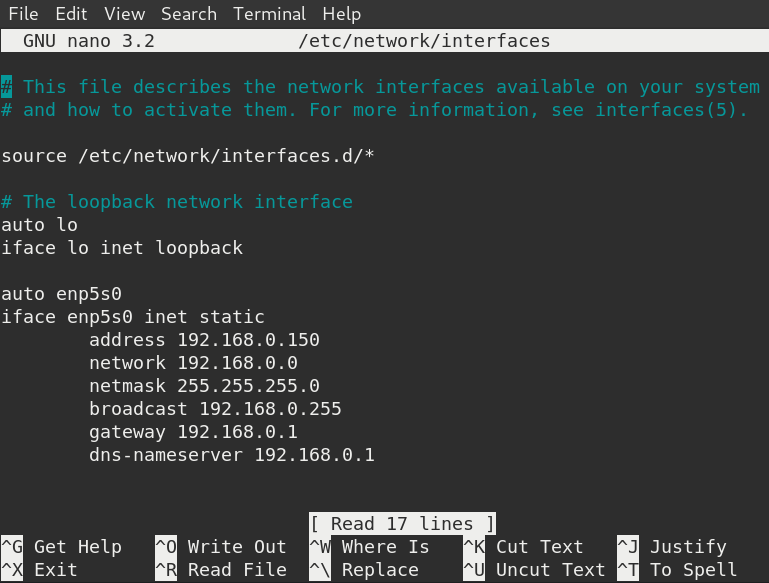
After the system is installed, static IP should be assigned to the machine. There are 3 ways to do it: assign IP reservation on DHCP server, assign static IP via GUI and networking-manager, or assign static IP via /etc/network/interfaces. Since Proxmox needs to create bridges for VMs, 3rd way is recommended, otherwise it will cause network issues. Additionally an address pool 192.168.0.150-153/24 should be excluded from DHCP server on router in order to prevent IP address conflict.
Proxmox can be installed on Debian via official guide. Briefly, it requires:
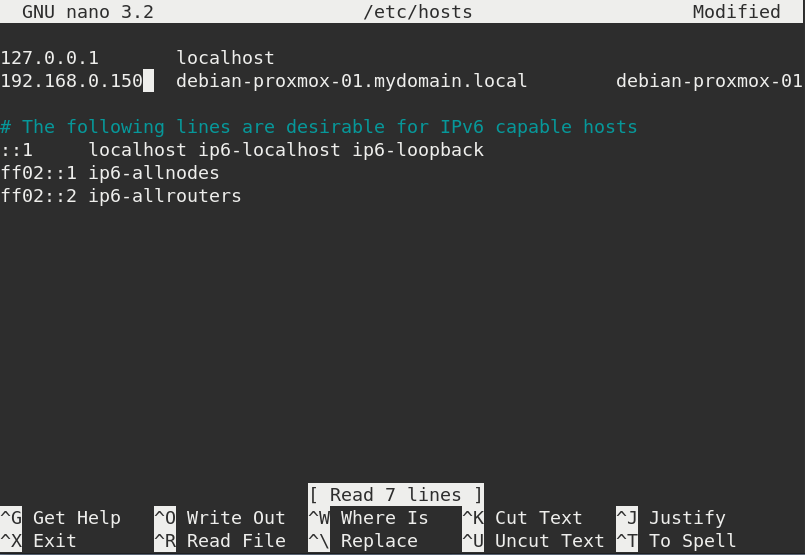
- changing
/etc/hostsfile, 127.0.1.1 should be changed to IP address of the node.
- adding Proxmox repository for
apt, linedeb http://download.proxmox.com/debian/pve buster pve-no-subscriptionshould be added to the file/etc/apt/sources.list.d/pve-install-repo.list - adding Proxmox repository key, command
wget http://download.proxmox.com/debian/proxmox-ve-release-6.x.gpg -O /etc/apt/trusted.gpg.d/proxmox-ve-release-6.x.gpg - running command
sudo apt update && full-upgradeto have all the latest packages installed - running command
sudo apt install proxmox-ve postfix open-iscsito install necessary packages - to install it on the server, it may be necessary to run
sudo apt remove os-proberto prevent scanning all the partitions for boot entries.
Installing Proxmox as a standalone system
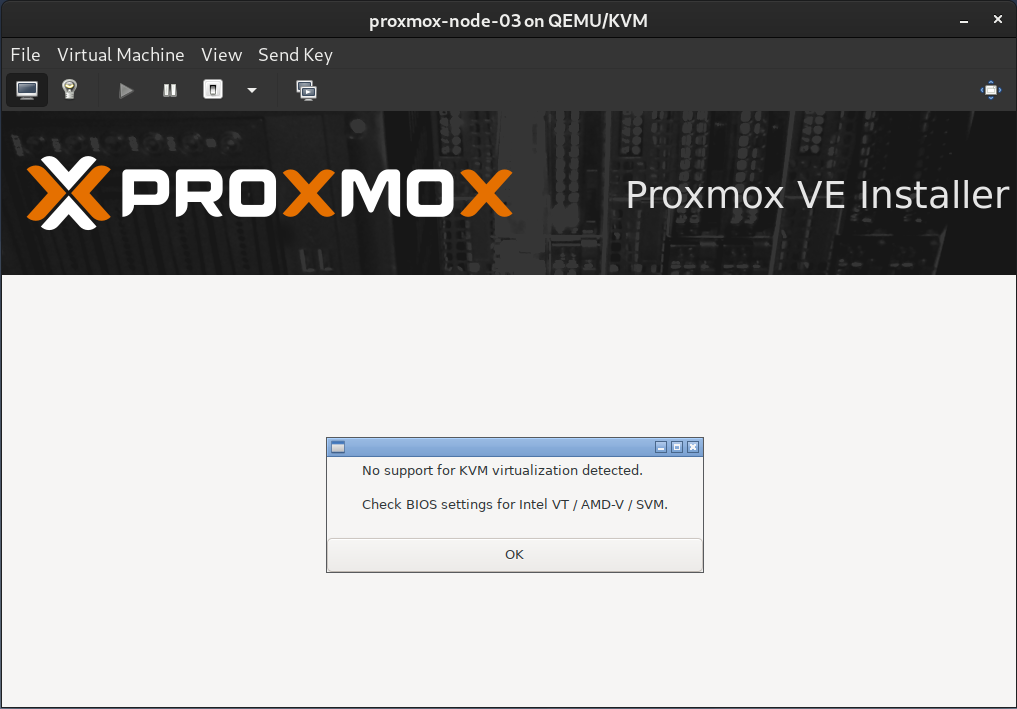
I used this option to create No. 3 cluster node. This node won’t manage any virtual machines, it will just ‘observe’ the cluster, which means that it can be launched on a virtual machine. As a platform for it’s creation I’ll use KVM.
During the installation Proxmox checks the system and alerts if there is a problem with virtualization support. This message will appear if you install node No. 3 on the virtual machine.
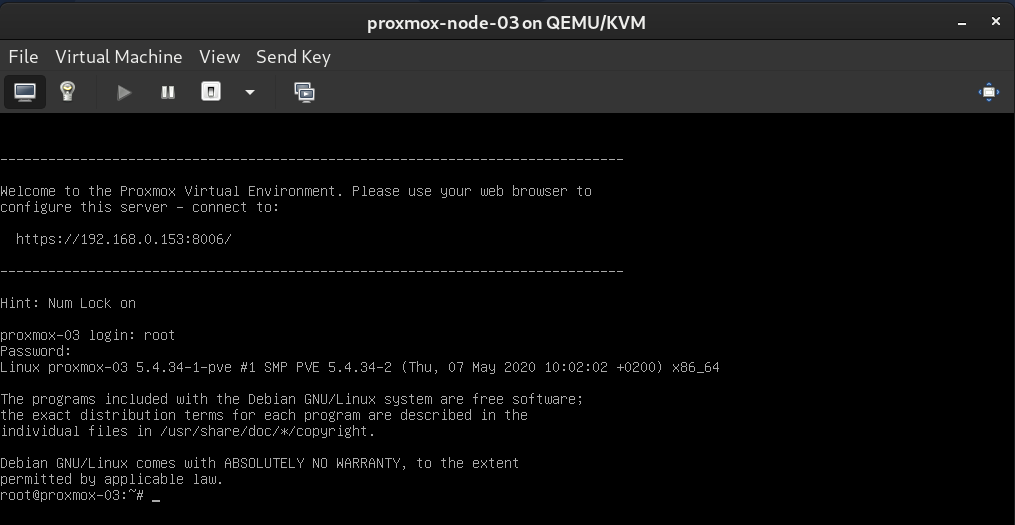
Proxmox will also ask for an address of the machine and hostname. When it comes to hostname, here it’s FQDN, which means hostname.domain. In my case hostname is proxmox-03, domain is mydomain.local.

After the setup is completed, server screen will offer command-line login.
Adding machines to the cluster
In order to connect to the node, I’ll use SSH, command ssh root@IP_of_node run from any other device on the network. The first node of my cluster is 192.168.0.150, debian-proxmox-01. Command below creates a new cluster.
root@debian-proxmox-01:~# pvecm create local-cluster
Corosync Cluster Engine Authentication key generator.
Gathering 2048 bits for key from /dev/urandom.
Writing corosync key to /etc/corosync/authkey.
Writing corosync config to /etc/pve/corosync.conf
Restart corosync and cluster filesystem
root@debian-proxmox-01:~# pvecm status
Cluster information
-------------------
Name:             local-cluster
Config Version:   1
Transport:        knet
Secure auth:      on

Quorum information
------------------
Date:             Sat Nov 14 13:32:02 2020
Quorum provider:  corosync_votequorum
Nodes:            1
Node ID:          0x00000001
Ring ID:          1.5
Quorate:          Yes

Votequorum information
----------------------
Expected votes:   1
Highest expected: 1
Total votes:      1
Quorum:           1
Flags:            Quorate

Membership information
----------------------
    Nodeid      Votes Name
0x00000001          1 192.168.0.150 (local)
Now the second node should be added to cluster. We should login on no No.2 via SSH and run command pvecm add IP_of_node_no_1 to attach node to cluster. As we can see, cluster requires root password, that’s why root account must be enabled on Debian system during installation.
root@debian-proxmox-02:~# pvecm add 192.168.0.150
Please enter superuser (root) password for '192.168.0.150':
Establishing API connection with host '192.168.0.150'
The authenticity of host '192.168.0.150' can't be established.
X509 SHA256 key fingerprint is ...
Are you sure you want to continue connecting (yes/no)? yes
Login succeeded.
check cluster join API version
No cluster network links passed explicitly, fallback to local node IP '192.168.0.151'
Request addition of this node
Join request OK, finishing setup locally
stopping pve-cluster service
backup old database to '/var/lib/pve-cluster/backup/config-1605357468.sql.gz'
waiting for quorum...OK
(re)generate node files
generate new node certificate
merge authorized SSH keys and known hosts
generated new node certificate, restart pveproxy and pvedaemon services
successfully added node 'debian-proxmox-02' to cluster.
root@debian-proxmox-02:~#
After the step below, if we check the cluster from node No.1, it looks like this:
root@debian-proxmox-01:~# pvecm nodes

Membership information
----------------------
    Nodeid      Votes Name
         1          1 debian-proxmox-01 (local)
         2          1 debian-proxmox-02
root@debian-proxmox-01:~#
Installing ISCSi server
In order to run shared storage for VMs I’ll use iSCSI server. As for production, this network should be completely separated from the main one and is usually run on SFP instead of ETH, however, as for test cluster and home conditions, the server will have an address from main network, 192.158.0.153/24. In order to run the server, I’ll create a virtual machine on 3rd physical machine, install Ubuntu there and run sudo apt install tgt, which is a package of iSCSI target (storage server).
In order to configure tgt, there needs to be a storage created. There are 3 ways: create second virtual disk and attach to VM, create another partition on the main virtual disk, or create one big partition on main virtual disk, create storage file via sudo dd if=/dev/zero of=/var/lib/iscsi_disks/disk01.img count=36000 bs=1M status=progress
Later this partition should be added to tgt via the config file of ISCSI target, therefore I created file /etc/tgt/conf.d/target01.conf with the following content.
<target iqn.2020-11.proxmox.srv:dlp.target01>
    backing-store /var/lib/iscsi_disks/disk01.img
    #initiator-name iqn.2020-11.proxmox.srv:www.initiator01
    #incominguser username password
</target>
As we can see, initiator-name and incominguser lines are disabled. As for November 2020, Proxmox doesn’t support authorization for iSCSI from web panel. Such tgt config can be left like this for test cluster only, production cluster must be secured at least like this.
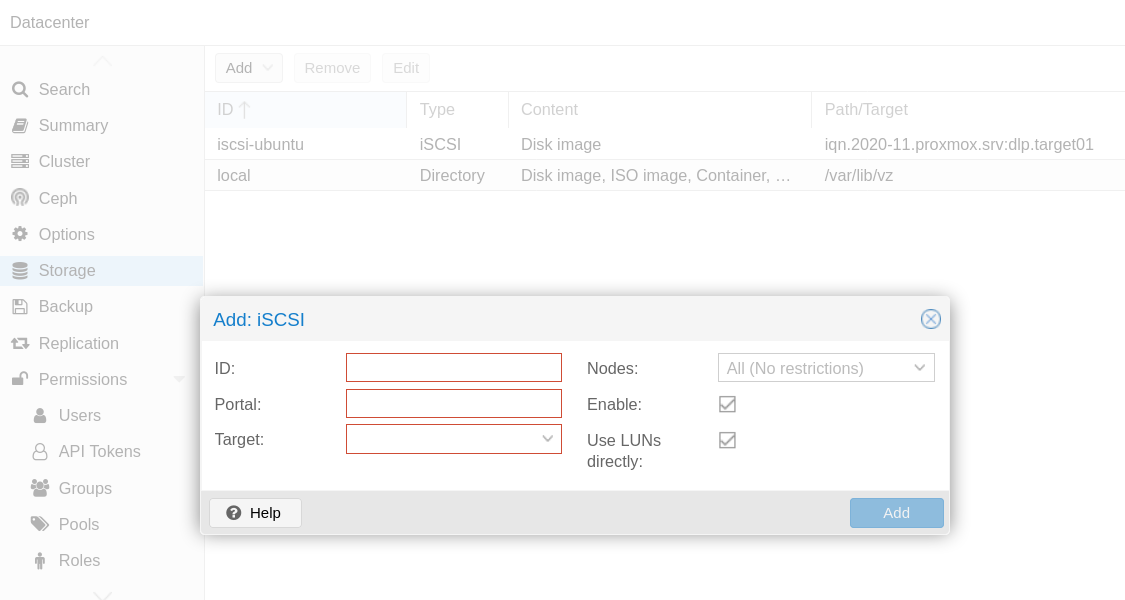
Connecting iSCSI storage to cluster
Connecting iSCSI storage to cluster can be done from web panel. Cluster requires unique ID of storage, IP address of the server and target name (the one from tgt config file).
Creating VM
In order to create VM, there needs to be a network bridge configured on LAN adapter. If we take a look on the default configuration of pure-Proxmox machine and Proxmox-on-Debian machine, they differ. Proxmox expects network settings to be the following:

iface eno1 inet manual

auto vmbr0
iface vmbr0 inet static
        address 192.168.0.151
        netmask 255.255.255.0
        network 192.168.0.0
        broadcast 192.168.0.255
        gateway 192.168.0.1
        bridge-ports eno1
        bridge-stp off
        bridge-fd 0
Network settings should be changed on both machines, planned as HA nodes. In the config above the name of the bridge vmbr0 should be the same on the machines, while bridge-ports may differ, it depends on how your system determines the main network interface (can be check via ip link).
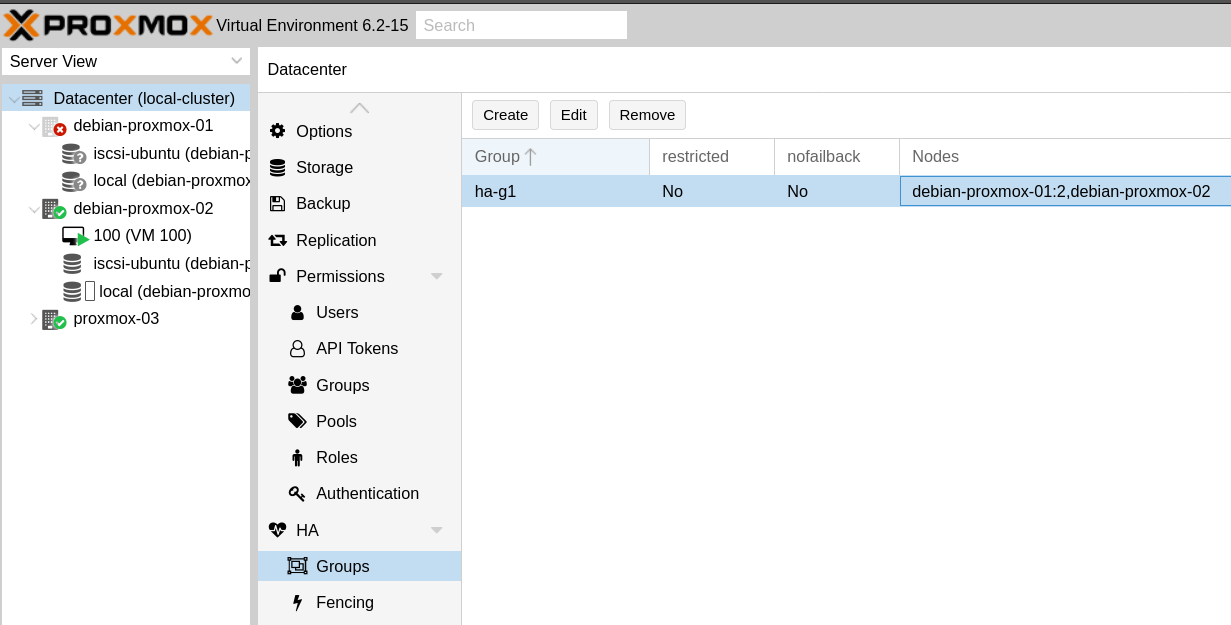
Virtual machine can be created on node No.1, and later, in the cluster tab HA, you should create a group of servers (node No. 1 and node No.2 only), and add VM to this group. The logics is the following: cluster itself consists of 3 nodes, but HA group consists only of those nodes, which can take VM on board).
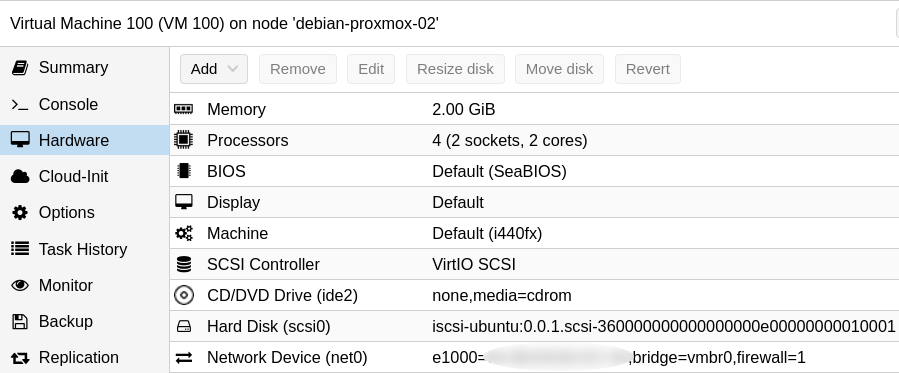
In order to test VM, any OS and package can be installed, as an example can be OpenMediavault, open-source NAS with web panel. During the VM creation, don’t forget to use iSCSI storage as VM storage disk. Configuration of created VM should be similar to this.
Checking the HA
After all the steps below node No.1 can be turned off from the network.
In less than 5 minutes, the virtual machine becomes available again, and, as we can see from web panel, VM already belongs to the node No. 2, although it has been launched on the node No. 1. This experiment confirms that HA cluster works correctly.
From 192.168.0.103 icmp_seq=229 Destination Host Unreachable
From 192.168.0.103 icmp_seq=230 Destination Host Unreachable
From 192.168.0.103 icmp_seq=231 Destination Host Unreachable
From 192.168.0.103 icmp_seq=232 Destination Host Unreachable
64 bytes from 192.168.0.104: icmp_seq=235 ttl=64 time=16.7 ms
64 bytes from 192.168.0.104: icmp_seq=236 ttl=64 time=1.34 ms
64 bytes from 192.168.0.104: icmp_seq=237 ttl=64 time=1.10 ms
Additionally, if you set priorities of the nodes in HA group, virtual machine can migrate back to node No.1 after it returns back online, and it will happen without any downtime (under the condition that both nodes are up and running).