Installing Arch Linux with GUI on GPT disks
Date: January 04, 2020
Arch Linux is a popular Linux distribution, which has a huge opportinity for customisation and enough low system requirements. However, it has a drawback of complexity, because installation process happens command-line, without GUI. In this guide I’ll try to explain some sophisticated installation details and reduce the time you’ll spend on system configuration.
Arch Linux installation process is based on running various commands manually, while Ubuntu and some other distributions have installation GUI. Before installation you need to create a Bootable USB using ISO file, which can be downloaded via torrent link or HTTP mirrors. Bootable USB can be created by any program, one of the options is open-source Rufus.
Official installation guide can be found here.
First thing to check is the interface your motherboard supports for bootloader. There are 2 options: BIOS (sometimes mentioned as ‘Legacy’ in motherboard settings) and UEFI. UEFI is used on majority of new motherboards.
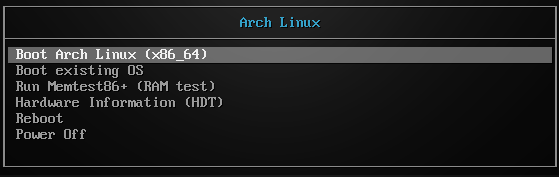
As for January 2020, BIOS loader looks like this.
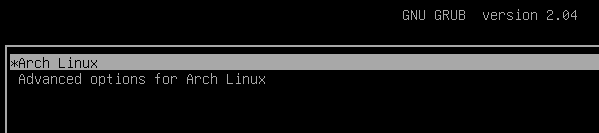
UEFI loader looks like this.

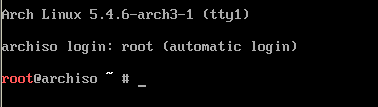
After the system is booted from USB, we get an access to command line of Live USB system.
Next step in system installation is configuring hard drive. It’s simpler if we have full HDD for Linux and harder if we want to install it alongside Windows, where wrong steps may lead to data loss and breaking the system. I’ll show a simpler case, configuring the whole HDD for Linux.
Depending on motherboard bootloader type, there should be choosen a type of partition table for HDD. Most popular ones are MBR and GPT: MBR supports legacy hardware while GPT is newer and supports 2+TiB drives. Details about difference between them can be found on Arch Linux Wiki.
Common schemas for bootloader and partition table type are BIOS/MBR and UEFI/GPT. However, there can be other variations.
After the choice is done, Arch Linux installation can be started from the first step: partitioning hard drive.
MBR partitioning is usually done via fdisk command, while GPT via gdisk. I’ll use gdisk.
gdisk -l /dev/sda shows, that HDD doesn’t have any partitioning table.

gdisk /dev/sda creates GPT entry in the memory and allows to edit partitioning.
Official wiki provides an example how partition layout should look like.
First I’ll create EFI system partition. In order to do that I’ll type n (command to create new partition), partition number is 1 by default, first sector should be left default by pressing Enter, the size is +260M, Hex code (or type) is ef00.
Next step is creating partition for / directory (this partition will be used for installing system files and packages). It can be created by commands n, Enter, Enter, +32G, Enter.
Third partition will be swap file. It’s recommended to make it over 512MB, or at least the size of RAM to use hibernation. I have 1GB RAM and Iset the size 1.5GB (unlike Windows, it will be harder to expand it later).
Command for its creation are n, Enter, Enter, 1536M, 8200.
All the rest of HDD space will be given for users’ /home repository. n, Enter, Enter, Enter, Enter will do the job.
Overview of planned partition table can be received by command p, and changes are written by w command.
Except for creating partitions, they should be formatted an appropriate way.
mkfs.ext4 /dev/sda2
mkswap /dev/sda3
mkfs.ext4 /dev/sda4
After partitions are configured, they can be mounted, so that necessary data will be copied on them.
mount /dev/sda2 /mnt
mkdir /mnt/home
/mount /dev/sda4 /mnt/home
After previous steps are done, there needs to be an internet connection established. Arch Linux LiveUSB can connect automatically, if you have a connection via LAN port and DHCP server is enabled on the router.
ping archlinux.org can show whether connection is established successfully.
pacman -Syy updates packages database.
pacstrap /mnt base linux linux-firmware installs minimally required system packages.
pacstrap /mnt dhclient installs DHCP client.
pacstrap /mnt nano installs simple command-line notepad.
pacstrap /mnt grub efibootmgr dosfstools installs GRUB bootloader, efibootmgr (necessary for GRUB installation script) and dosfstools (allows to format partitions as FAT32).
Since main packages are installed, some other basic things can be configured.
genfstab -U /mnt >> /mnt/etc/fstab command creates fstab file, which is responsible for partition mount on system start.
nano /mnt/etc/hostname is the file, where you should write hostname of your device.
nano /mnt/etc/hosts is the file, responsible for mapping of IP to URLs. YOUR_HOSTNAME should coincide with the one from hostname file.
/etc/hosts
127.0.0.1	localhost
::1		localhost
127.0.1.1	YOUR_HOSTNAME.localdomain	YOUR_HOSTNAME
Pre-last step for Live USB is creating bootloader (in this case UEFI).
mkfs.fat -F32 /dev/sda1 formats EFI partition /dev/sda1 as FAT32.
Everything is ready for GRUB installation and configuration.
efivar --list helps to check additionally whether Live system is loaded in UEFI mode (it’s required for installing GRUB UEFI).
arch-chroot /mnt changes root directory on /mnt.
mkdir efi creates a folder for mounting, and mount /dev/sda1 /mnt/efi mounts it, so that data can be written on partition.
The main commands for GRUB UEFI installation are
grub-install --target=x86_64-efi --efi-directory=efi --bootloader-id=GRUB
grub-mkconfig -o /boot/grub/grub.cfg
The last step on Live USB is setting root user password via command passwd and rebooting the system via reboot command. USB drive (or ISO image for virtual machine) can be removed, and bootloader should appear on system start.
System is launched and ready for further configuration. First thing to check on new system is availability of the Internet.
It can be done by pinging:
- your gateway (often it’s 192.168.0.1 or 192.168.0.100);
- some ip like
8.8.8.8; - website with domain, like
archlinux.org.
ip addr show is a good tool to check your network device status (UP/DOWN and its IP). I’ve noticed that mine is DOWN didn’t receive IP address from DHCP.
ip link set dev NETWORK_INTERFACE up (where NETWORK_INTERFACE can be taken from previous command) turns on the interface.
dhclient NETWORK_INTERFACE receives IP from DHCP.
If you can ping IP outside your network (like 8.8.8.8), but can’t ping archlinux.org, it means that your nameserver is not configured. It can be done manually by adding nameserver 8.8.8.8 in .conf file nano /etc/resolv.conf.
After the connection is configured, packages database can be updated via pacman -Syy, and additional packages can be installed via command pacman -S.
For installing GUI, there should be chosen a display server (for ex. Xorg), desktop environment (for ex. LXDE) and diplay manager (for ex. LXDM).
They can be installed via command pacman -S xorg xlde lxdm. After the installation the service of display manager should be enabled on startup, and it will automatically start display environment and display server.
systemctl enable lxdm is a necessary command for that.
As for my system, these steps were enough to have a GUI launch after reboot. However, it’s also recommended to install video card drivers and make a .conf file of Xorg server, which will be aware of your equipment and drivers.
Xorg :0 -configure creates a .conf file.
cp /root/xorg.conf.new /usr/share/X11/xorg.conf.d/01-default.conf copies file into necessary directory.
cat /var/log/Xorg.o.log allows to watch a log of Xorg server.
After the desktop is configured, non-root user should be created. It’s important not only because of security, also because root can’t launch some GUI programs and install AUR packages.
useradd -m new_user
passwd new_user