Uploading OpenStreetCam images from Windows using Linux Mint Live over VirtualBox
Date: December 23, 2019
OpenStreetCam is a platform for viewing and uploading street view images. It’s an open-source alternative of Mapillary service. However, as for December 2019, the platform doesn’t have web uploader. Which means, if you take street view pictures by action cameras (or any another non-Android and non-iOS device) and you’re a Windows user, you’ll have a hard time uploading images since official CLI upload scripts are designed for Linux.
However, there are 2 upload solutions:
-
Install a LiveUSB of some Linux distribution and launch your PC from pendrive;
-
Create a virtual machine on your Windows system.
The idea of running virtual machine may sound better because Linux has hard time mounting Windows 10 partitions (they may remain blocked even after OS shutdown), which means that getting read-write access to images can be another obstacle (writing access is necessary since OSC scripts create files in image folders during upload).
Let’s begin from downloading Linux distribution and configuring VirtualBox virtual machine.
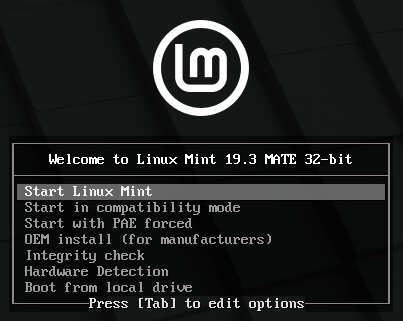
There is a huge variety of Linux distros, and I’ll use Linux Mint 19.3 32-bit with MATE desktop. It was chosen because it has both 32,64 bit versions (it can be launched even on slow devices), it has Live version (can be used without installation) and it has Python 3.6.8 on board (current upload scripts on commit 896b44c are incompatible with Python 3.8).
VirtualBox installer can be taken from official website. It has a GUI installer, which shouldn’t be a problem. After the procedure is completed, virtual machine can be created.
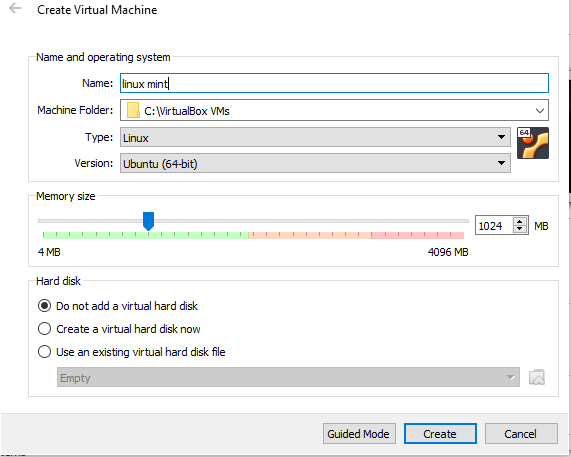
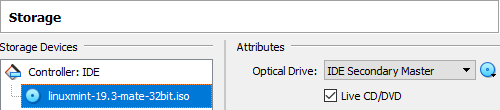
Additinally there should be some things changed in its setting. At first, I’ll add more Video Memory in “Display” section and I’ll add Linux Live ISO in “Storage” section.

Virtual machine can be launched.
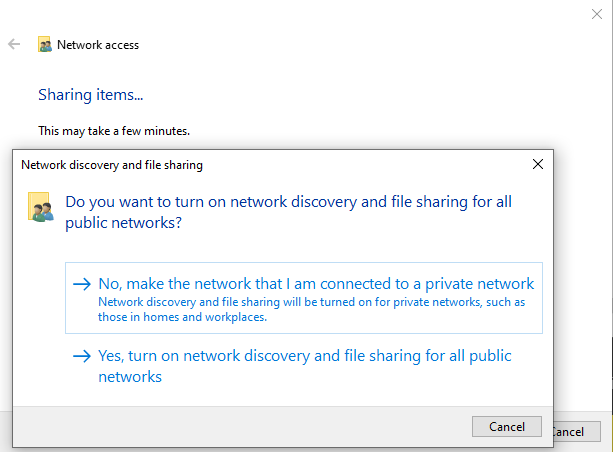
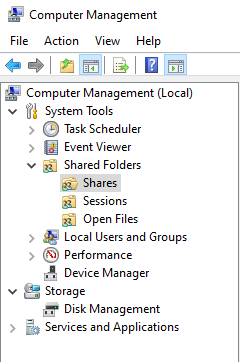
Before we’ll start installing scripts, we should give access access to our images files. VirtualBox allows to pass a USB pendrive to virtual machine or to give access to HDD folder, but it may be easier to give network access to the folder. If you’re using systems older than Windows 10, you should check settings of “Networking and Sharing Center” to make sure, that your network is marked as “Home” (since “Public” networks have file sharing feature disabled).
In order to simplify Linux configuration, it makes sense to get access to folder via IP. Home router use DHCP to assign IP addresses to devices, for permanent usage it make sense to setup static ip of your host machine. As for now, let’s run cmd and get our IP via command ipconfig.

Since network access is configured, let’s return back to virtual machine and configure it.
Commands will be run via Terminal, which can be launched from the menu at the bottom  or via shortcut “Ctrl+Alt+T”.
Before running commands it makes sense to check if we have a network access to pictures folders. Linux Mint already has cifs-utils, but if you’re using a different Linix distro, you’ll need to install it.
mkdir osc will create a new directory.
sudo mount -t cifs -o user=USERNAME,file_mode=0777,dir_mode=0777 //192.168.xx.xx/osc ~/osc/ is the main command for network folder mount. Your should insert your own USERNAME and IP address to get access to files. 0777 in this command grants full read-write access to the folder. If command completed successfully, you can see your shared files in “osc” folder (can be accessed via “osc” shortcut on the desktop).
Now we can install necessary software. Firstly we should update package lists via sudo apt update. Script will be taken from GitHub, that’s why we need to install git via sudo apt install git.
Next step is configuring Python environment.
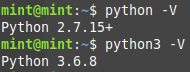
python -V shows that we have old Python2 installed.
python3 -V shows us correct version for script launch. As for the scripts on commit 896b44c, the script doesn’t run on Python 3.8.0, but version 3.6.8 satisfies its requirements.
All the necessary Python packages can be installed directly into system, however, I’ll use a virtual environment for that because scripts require certain packages versions to run:
sudo apt install python3-venvwill install necessary software for creating virtual environment;python3 -m venv env_osccreates such environment to the folder “env_osc”;source env_osc/bin/activateactivates the environment;python -Vshows, that command “python” has a correct version now.
Next step is downloading and launching scripts:
git clone https://github.com/openstreetcam/upload-sctiptswill make a download;cd upload-scripts/will enter a necessary folder;pip install -r requirements.txtwill install necessary Python packages;
The system is ready for images upload. Detailed instruction can be found on GitHub page of project, and Exif images can be uploaded via
python osc_tools.py upload -p ~/osc/.
The script will ask us to grant it access to OpenStreetCam account, and after this step upload will start.

After the upload is finished, network access to the folder on Windows can be stopped.
If you’re planning to upload images often, it makes sense to install full Linux system on virtual hard drive, so that you won’t repeat the same steps each upload.